Has anyone tried installing Cockpit and 45Drives repo on Debian? I’m trying to get dalias to run so I can use the disk aliasing and the “45Drives Disks” section on Cockpit; however, I’m getting and error when running “sudo dalias -t HL15” it asks me to Insert/Remove disk 1-1 which I do, then it correctly says Drive Remove, or Drive Inserted but then I’m guessing errors out saying “Duplicate Device Path Found - Ignoring” and then asks me to Insert/Remove a drive from slot 1-1 again…and again and again, etc.

I’ve used it a few times as I keep forgetting to backup the file “/etc/vdev_id.conf” before installing ubuntu. I get these same messages and it’s taken a few inserts/removes to get it to go. I was also using the same sata drive to aliasing by inserting, removing, and then inserting in the next slot. In my scenario, I would get the “duplicate device path found” but it was valid since I was removing the drive to go into the next slot.
My advice is be patient and keep trying. I’ve found that inserting the drive, waiting for the detection, then removing and waiting again for the next message to work for me. If detection fails, remove and re-insert quickly.
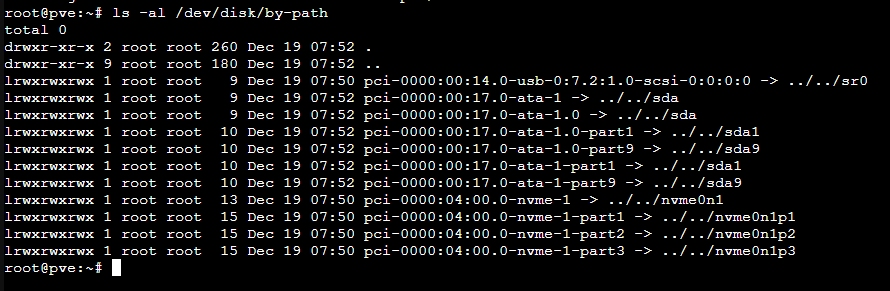
Can you put a single drive in slot 1-1 and provide the output of ls -al /dev/disk/by-path ?
@Krushal, It appears that @mhooper has already jumped on this to assist. He is the one who created the tool so you are in good hands
So the only disks that are in the system are the nvme on the motherboard for the OS and then 1 sata disk in slot 1-1.
I’ll try this as well when I get home from work this evening. I knew I shouldn’t have racked it until I had everything setup and working. Rookie mistake. ![]()
Ok, so based on your output. There are two symlinks made to the same device. (/dev/sda). I’ve only ever written, tested and packaged 45drives-tools (which includes dalias) for Rocky and Ubuntu. I’ve seen symlinks made using either pci-0000:00:XX.0-ata-1 or pci-0000:00:XX.0-ata-1.0, but never both. I guess Proxmox (Debian) does that. That’d be why my program is getting confused, because you remove two devices from /dev/disk/by-path when you remove a drive from a slot. I only handle the case where device paths to a physical disk are unique at present.
Either way. I made a patched version of dalias for you if you want to try it.
It will use the device path of /dev/disk/by-path/pci-0000:00:17.0-ata-1 over /dev/disk/by-path/pci-0000:00:17.0-ata-1.0 if it detects two devices were removed/inserted at a time.
Just replace /opt/45drives/dalias/dalias
with this one: https://scripts.45drives.com/dalias_patch/dalias
Then give er a try.
Commands to run to do this:
cd ~
curl -LO https://scripts.45drives.com/dalias_patch/dalias
chmod +x dalias
sudo mv ~/dalias /opt/45drives/dalias/dalias
sudo dalias -t HL15
Let me know how it turns out. I can attempt to make a more elegant solution to add upstream to 45drives-tools in the future. Oh, and make a backup of /etc/vdev_id.conf if it works for you.
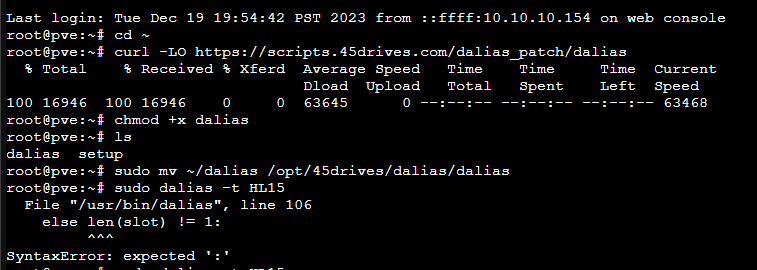
Sorry about that, should have been an elif on that line. I changed it. you can use the same commands as before to download and run it again. Apologies.
1 Like
No worries at all, you are helping us there is no need to apologize! ![]()
Ran it again, this time all disks were out and inserted disk 1-1, but it thought I also inserted a disk into 1-2.

Is there a file to clear first to start from scratch or does dalias essentially do that automatically?
dalias will keep all of the device paths in memory and get you to confirm the creation of /etc/vdev_id.conf and loading/triggering the required udev rules once you’ve gone through the mapping procedure for all of the devices in your list (1-1 thru 1-15) Unfortunately you aren’t able to get to that point yet ![]()
I just pushed out another patch with that same link. This time I’m going to ignore any device paths in /dev/disk/by-path that don’t end in ‘.0’. That won’t be a criteria in the mainline release because it will break in other circumstances for other people who don’t have the “.0” at the end by default i.e Ubuntu.
This is tricky because I’m normally looking for changes in the devices present in /dev/disk/by-path (while ignoring those that are partitions) but since you have two created every time you insert/re-insert a drive (and potentially only one depending on if the check is taking place between the creation of pci-0000:00:17.0-ata-1 and pci-0000:00:17.0-ata-1.0 by your udev rules for slot 1-1 as an example.) Like, let’s say you plug in a drive, udev rule fires and makes pci-0000:00:17.0-ata-1, we check for changes, dalias sees the new pci-0000:00:17.0-ata-1. We use that as 1-1, now we move onto asking you to plug in 1-2, meanwhile the second udev rule that makes pci-0000:00:17.0-ata-1.0 from the first insertion finishes, dalias sees that you added a drive, it’s not in the list of device paths from before, so it must be 1-2.
I’ll need to check for substrings in the list and determine which ones are unique in a more involved check with more testing obviously for the mainline release going forward. (Thanks for being a beta tester btw ![]() )
)
1 Like
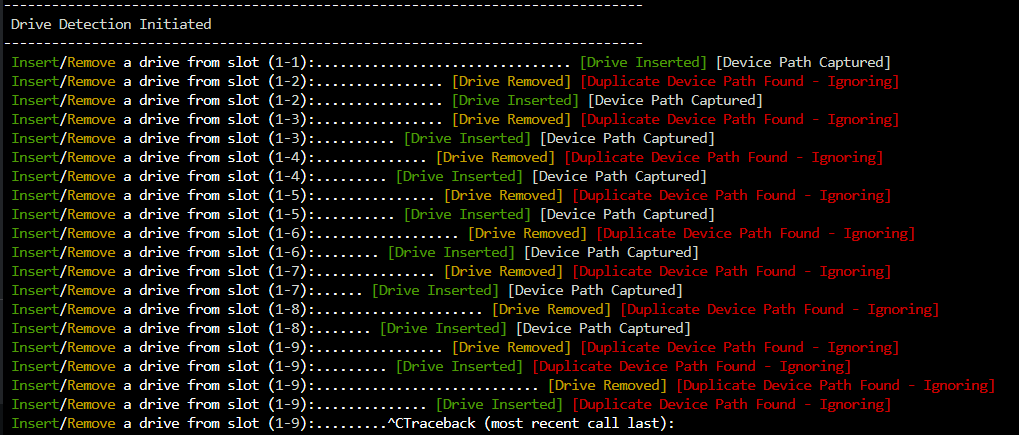
Okay did a quick test this morning (Merry Christmas Eve! lol). Besides the output appearing to be doubling up it looked like it was working until I got to drive 9. Once I got to drive 9 it stopped detecting the insert or removal:
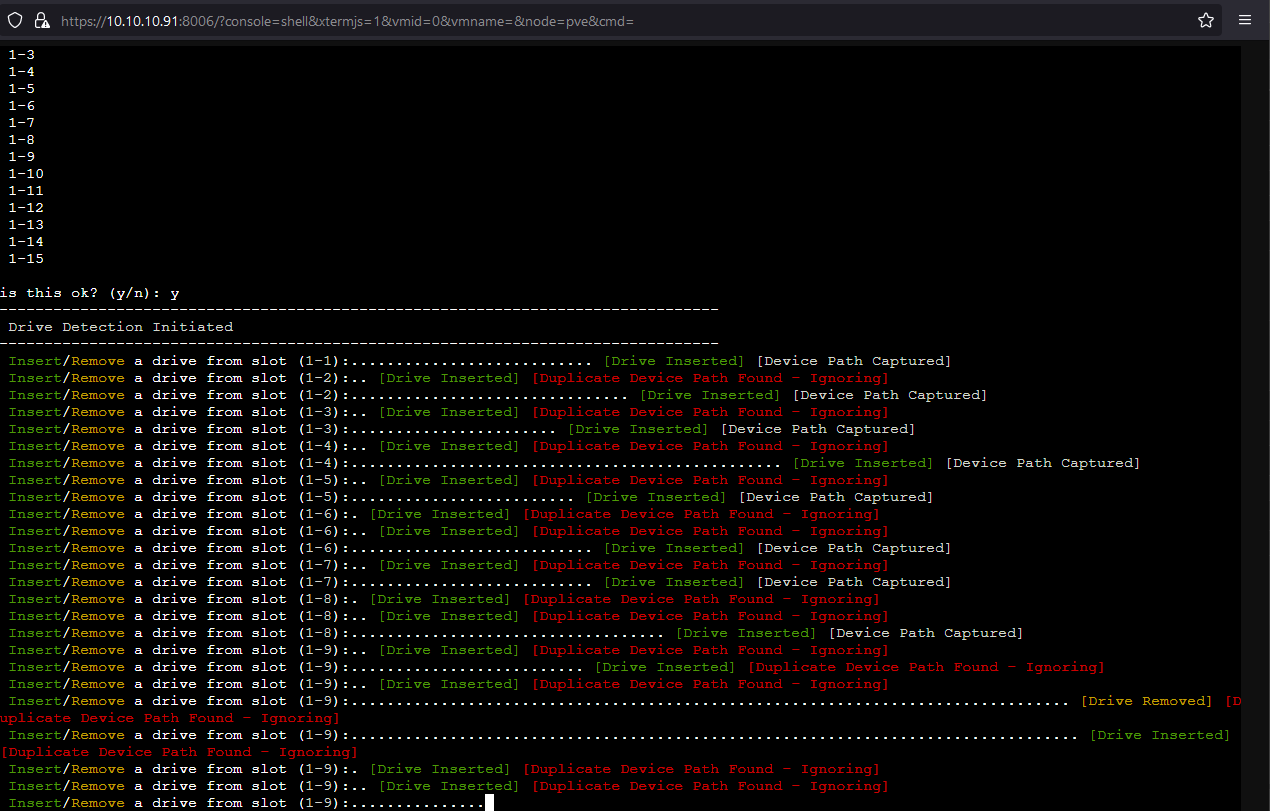
Not sure if there is any better detailed log I could provide you to help out?
I don’t mind beta testing, I just want my new server to work ![]()
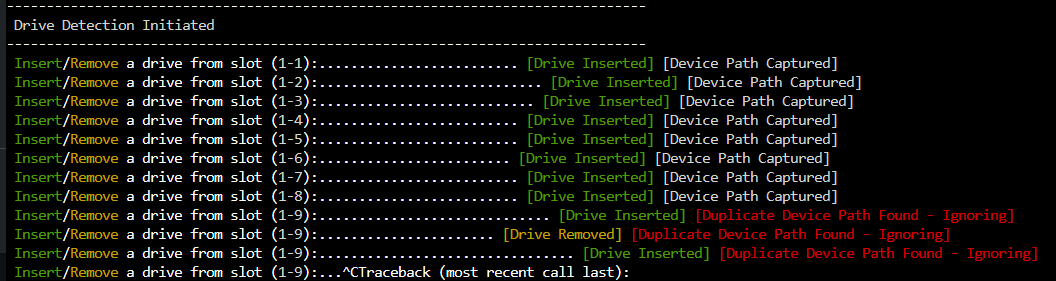
Noticed that some drives had odd partitions on them so I deleted them:

Now the output is cleaner but still failing on Disk 9, I even swapped what disk was in disk 9 with one that was from slot 15, same failure.
Would it be possible for you to try using the same HDD drive for all the slots? simply plug the drive into the first slot then take it out and plug it into the second etc? once the slots are aliased you can then put all your HDDs into the server
I just pulled all the drives, and used the same drive in all slots - once again up to slot 9 and then it did the same thing again:
Ill speak to @mhooper to see what we want to do next.
Here’s what you can do.
edit /opt/45drives/dalias/dalias.conf to look like this:
# -----------------------------------------------------------------------------
# /opt/45drives/dalias/dalias.conf
# -----------------------------------------------------------------------------
# This file is used by dalias (device aliasing program).
# Useage: Provide a list of device aliases in this file.
# Each entry must be on a line of its own.
# Whitespace will be automatically trimmed from each alias name.
1-1
1-2
1-3
1-4
1-5
1-6
1-7
1-8
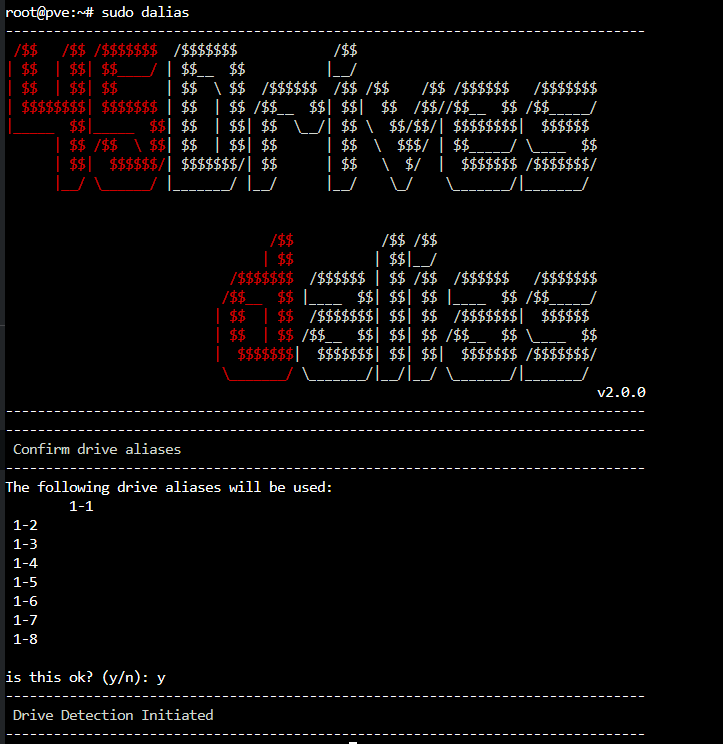
run sudo dalias (note, we’re not using the template argument here.). Map your drives 1-1 thru 1-8.
It will make /etc/vdev_id.conf once you have gone through the mapping process for 1-1 thru 1-8.
Make a backup of this somewhere, just in case you have trouble with the next part.
next, take every drive out of your system.
put a single drive into slot 1-9.
run ls -al /dev/disk/by-path
Look for the path to that disk in the output. (it shouldn’t have “part” in the name. look at your vdev_id.conf for an example what the path should look like.)
add a line in /etc/vdev_id.conf to alias slot 1-9 using the device path for your disk.
reload and trigger your udev rules:
sudo udevadm control --reload-rules
sudo udevadm trigger
run lsdev
If you see a drive in slot 1-9, you did it right.
Now, go ahead and take out the drive from 1-9 and Repeat this process for every remaining drive bay in your machine until you have a valid /etc/vdev_id.conf.
I don’t know why, but depending on how your drives are physically connected (slot 1-9 thru 1-15 are likely handled by another storage controller.) Things aren’t matching up the way the 1-1 thru 1-8. If you get stuck just post a screen grab of the output of ls -al /dev/disk/by-path with only drive 1-9 inserted and we’ll go from there.
1 Like
We did it!
Just to note on your last comment, I have the fully built HL15. I believe the backplane is split between the SATA and SAS controllers on the motherboard. I got the X11SPH-nCTPF version.
Here is a plaster of screen shots through this process, hopefully this helps.
Starting the process with only the first 8 drives as you instructed:
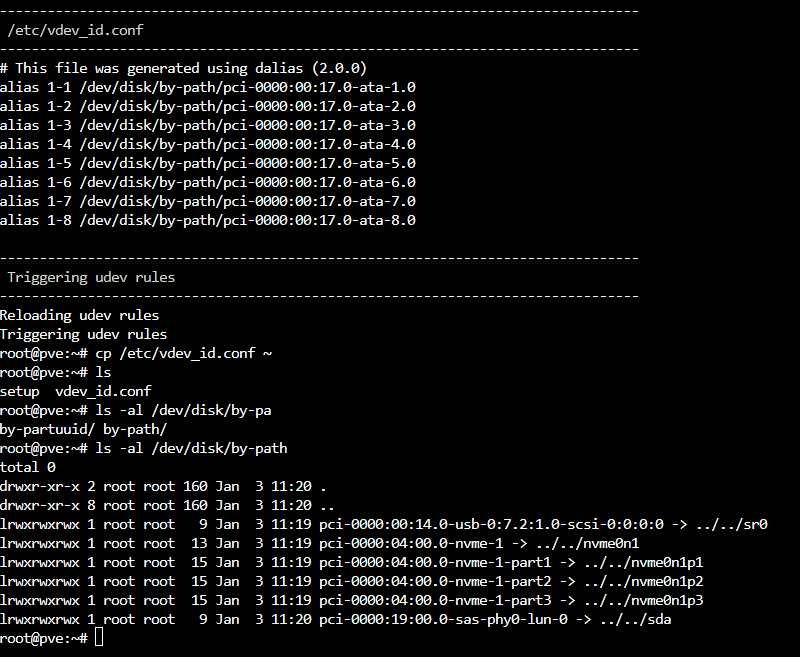
Getting the /etc/vdev_id.conf for the first 8 drives, then looking at ls-al /dev/disk/by-path
Slot 9 appears to start the drives that are on the SAS controller:
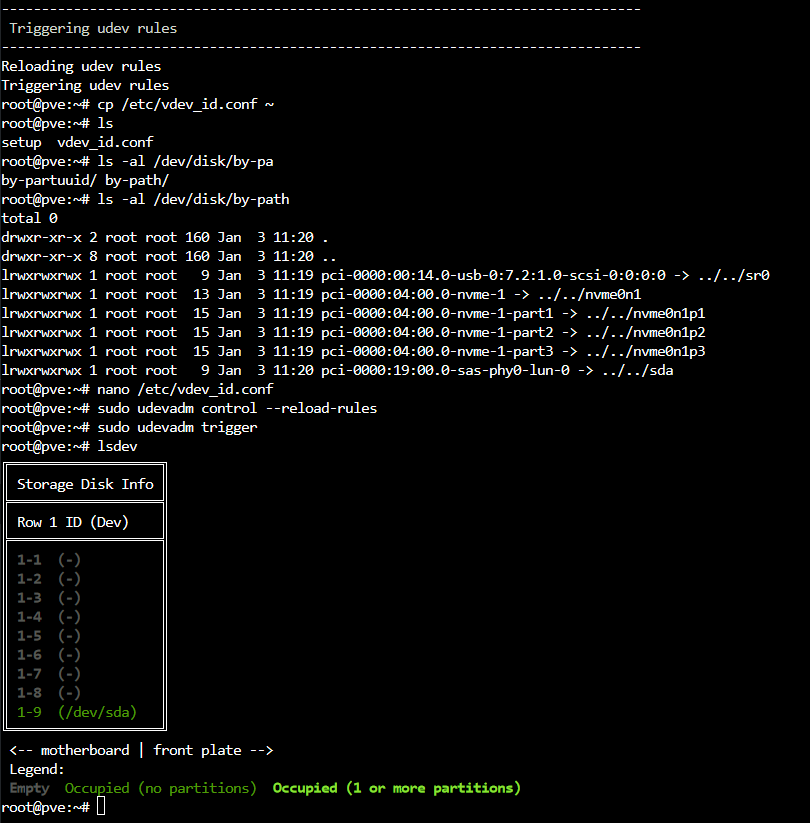
Adding that SAS path into the vdev_id.conf file and reloading had it detecting correctly:
Continued the process for the remaining drive slots:
Reloaded the rules/configuration. Reinserted all 15 drives back in and lsdev shows all 15 Drives, and the 45 Drives Disk interface in cockpit now works as well!

1 Like
Hell yeah! Glad we got there. I’m going to fire up a server with Proxmox to test an updated dalias program for a future release of 45Drives-tools so that it will work as desired for people in the same boat as you.
2 Likes
Here is how I rebuilt mine on a X11SPH-nCTF w/out dalias - in case you don’t want to insert/remove a bunch of disks.
ls -al /dev/disk/by-pathto capture current drives. This step isn’t strictly necessary if you know the format of the disk paths.
Example:
# ls -al /dev/disk/by-path
total 0
drwxr-xr-x. 2 root root 720 Jan 15 12:48 .
drwxr-xr-x. 9 root root 180 Jan 15 12:45 ..
...
lrwxrwxrwx. 1 root root   9 Jan 15 12:45 pci-0000:19:00.0-sas-phy0-lun-0 -> ../../sda
lrwxrwxrwx. 1 root root  10 Jan 15 12:46 pci-0000:19:00.0-sas-phy0-lun-0-part1 -> ../../sda1
lrwxrwxrwx. 1 root root  10 Jan 15 12:45 pci-0000:19:00.0-sas-phy0-lun-0-part9 -> ../../sda9
lrwxrwxrwx. 1 root root   9 Jan 15 12:45 pci-0000:19:00.0-sas-phy1-lun-0 -> ../../sdb
lrwxrwxrwx. 1 root root  10 Jan 15 12:46 pci-0000:19:00.0-sas-phy1-lun-0-part1 -> ../../sdb1
lrwxrwxrwx. 1 root root  10 Jan 15 12:46 pci-0000:19:00.0-sas-phy1-lun-0-part9 -> ../../sdb9
lrwxrwxrwx. 1 root root   9 Jan 15 12:46 pci-0000:19:00.0-sas-phy2-lun-0 -> ../../sdc
lrwxrwxrwx. 1 root root  10 Jan 15 12:46 pci-0000:19:00.0-sas-phy2-lun-0-part1 -> ../../sdc1
lrwxrwxrwx. 1 root root  10 Jan 15 12:46 pci-0000:19:00.0-sas-phy2-lun-0-part9 -> ../../sdc9
lrwxrwxrwx. 1 root root   9 Jan 15 12:46 pci-0000:19:00.0-sas-phy3-lun-0 -> ../../sdd
lrwxrwxrwx. 1 root root  10 Jan 15 12:46 pci-0000:19:00.0-sas-phy3-lun-0-part1 -> ../../sdd1
lrwxrwxrwx. 1 root root  10 Jan 15 12:46 pci-0000:19:00.0-sas-phy3-lun-0-part9 -> ../../sdd9
lrwxrwxrwx. 1 root root   9 Jan 15 12:46 pci-0000:19:00.0-sas-phy4-lun-0 -> ../../sde
lrwxrwxrwx. 1 root root  10 Jan 15 12:46 pci-0000:19:00.0-sas-phy4-lun-0-part1 -> ../../sde1
lrwxrwxrwx. 1 root root  10 Jan 15 12:46 pci-0000:19:00.0-sas-phy4-lun-0-part9 -> ../../sde9
lrwxrwxrwx. 1 root root   9 Jan 15 12:46 pci-0000:19:00.0-sas-phy5-lun-0 -> ../../sdf
lrwxrwxrwx. 1 root root  10 Jan 15 12:46 pci-0000:19:00.0-sas-phy5-lun-0-part1 -> ../../sdf1
lrwxrwxrwx. 1 root root  10 Jan 15 12:46 pci-0000:19:00.0-sas-phy5-lun-0-part9 -> ../../sdf9
lrwxrwxrwx. 1 root root   9 Jan 15 12:46 pci-0000:19:00.0-sas-phy6-lun-0 -> ../../sdg
lrwxrwxrwx. 1 root root  10 Jan 15 12:46 pci-0000:19:00.0-sas-phy6-lun-0-part1 -> ../../sdg1
lrwxrwxrwx. 1 root root  10 Jan 15 12:46 pci-0000:19:00.0-sas-phy6-lun-0-part9 -> ../../sdg9
lrwxrwxrwx. 1 root root   9 Jan 15 12:46 pci-0000:19:00.0-sas-phy7-lun-0 -> ../../sdh
lrwxrwxrwx. 1 root root  10 Jan 15 12:46 pci-0000:19:00.0-sas-phy7-lun-0-part1 -> ../../sdh1
lrwxrwxrwx. 1 root root  10 Jan 15 12:46 pci-0000:19:00.0-sas-phy7-lun-0-part9 -> ../../sdh9
...
In this case I’ve recabled slots 1-1 thru 1-8 to the X11SPH-nCTF’s onboard SAS ports via the AOC-S3008L-L8e and slots 1-9 thru 1-15 to the onboard SATA ports via the Intel C622.
SAS paths are /dev/disk/by-path/pci-0000:19:00.0-sas-phyX-lun-0 where X is the interface number.
SATA paths are /dev/disk/by-path/pci-0000:00:17.0-ata-X where X is the interface number.
The 0000:XX:XX.X is the ID of the PCI device - the SAS and SATA controllers.
# lspci
...
00:17.0 SATA controller: Intel Corporation C620 Series Chipset Family SATA Controller [AHCI mode] (rev 09)
...
19:00.0 Serial Attached SCSI controller: Broadcom / LSI SAS3008 PCI-Express Fusion-MPT SAS-3 (rev 02)
...
- Created new version of
/etc/vdev_id.conf.
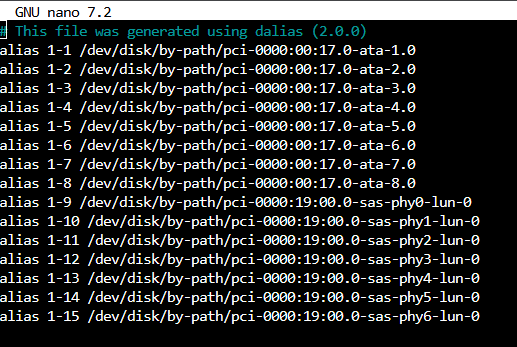
# Manual creation; 2023-12-29
# Use `dalias` under normal circumstances.

# SAS (AOC-S3008L-L8e)
alias 1-1 /dev/disk/by-path/pci-0000:19:00.0-sas-phy0-lun-0
alias 1-2 /dev/disk/by-path/pci-0000:19:00.0-sas-phy1-lun-0
alias 1-3 /dev/disk/by-path/pci-0000:19:00.0-sas-phy2-lun-0
alias 1-4 /dev/disk/by-path/pci-0000:19:00.0-sas-phy3-lun-0
alias 1-5 /dev/disk/by-path/pci-0000:19:00.0-sas-phy4-lun-0
alias 1-6 /dev/disk/by-path/pci-0000:19:00.0-sas-phy5-lun-0
alias 1-7 /dev/disk/by-path/pci-0000:19:00.0-sas-phy6-lun-0
alias 1-8 /dev/disk/by-path/pci-0000:19:00.0-sas-phy7-lun-0

# SATA (Intel C622)
alias 1-9 /dev/disk/by-path/pci-0000:00:17.0-ata-1
alias 1-10 /dev/disk/by-path/pci-0000:00:17.0-ata-2
alias 1-11 /dev/disk/by-path/pci-0000:00:17.0-ata-3
alias 1-12 /dev/disk/by-path/pci-0000:00:17.0-ata-4
alias 1-13 /dev/disk/by-path/pci-0000:00:17.0-ata-5
alias 1-14 /dev/disk/by-path/pci-0000:00:17.0-ata-6
alias 1-15 /dev/disk/by-path/pci-0000:00:17.0-ata-7
- Run
udevadm control --reload-rules - Run
udevadm trigger - Run
lsdevto confirm.
# lsdev
╔═══════════════════╗
║ Storage Disk Info ║
╠═══════════════════╣
║ Row 1 ID (Dev)    ║
╠═══════════════════╣
║ 1-1  (/dev/sda)   ║
║ 1-2  (/dev/sdb)   ║
║ 1-3  (/dev/sdc)   ║
║ 1-4  (/dev/sdd)   ║
║ 1-5  (/dev/sde)   ║
║ 1-6  (/dev/sdf)   ║
║ 1-7  (/dev/sdg)   ║
║ 1-8  (/dev/sdh)   ║
║ 1-9  (-)          ║
║ 1-10 (-)          ║
║ 1-11 (-)          ║
║ 1-12 (-)          ║
║ 1-13 (-)          ║
║ 1-14 (-)          ║
║ 1-15 (-)          ║
╚═══════════════════╝
 <-- motherboard | front plate -->
 Legend:
 Empty  Occupied (no partitions)  Occupied (1 or more partitions)
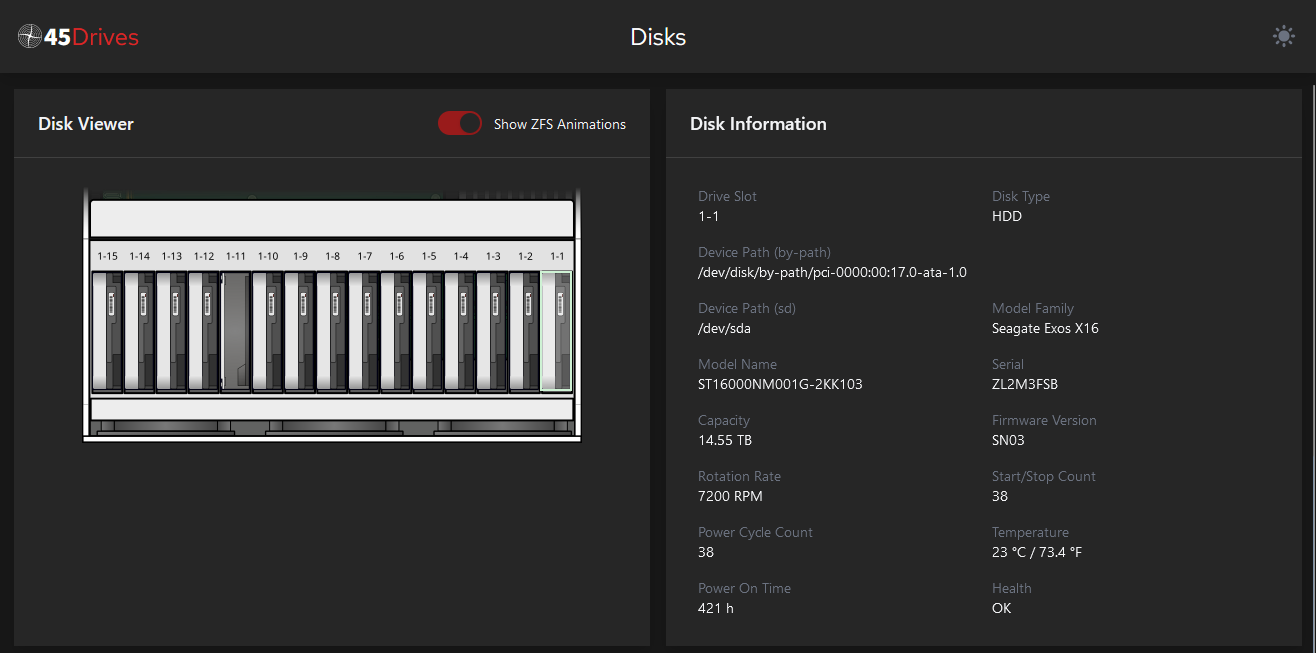
Disk Viewer feature is fully-functional.
2 Likes