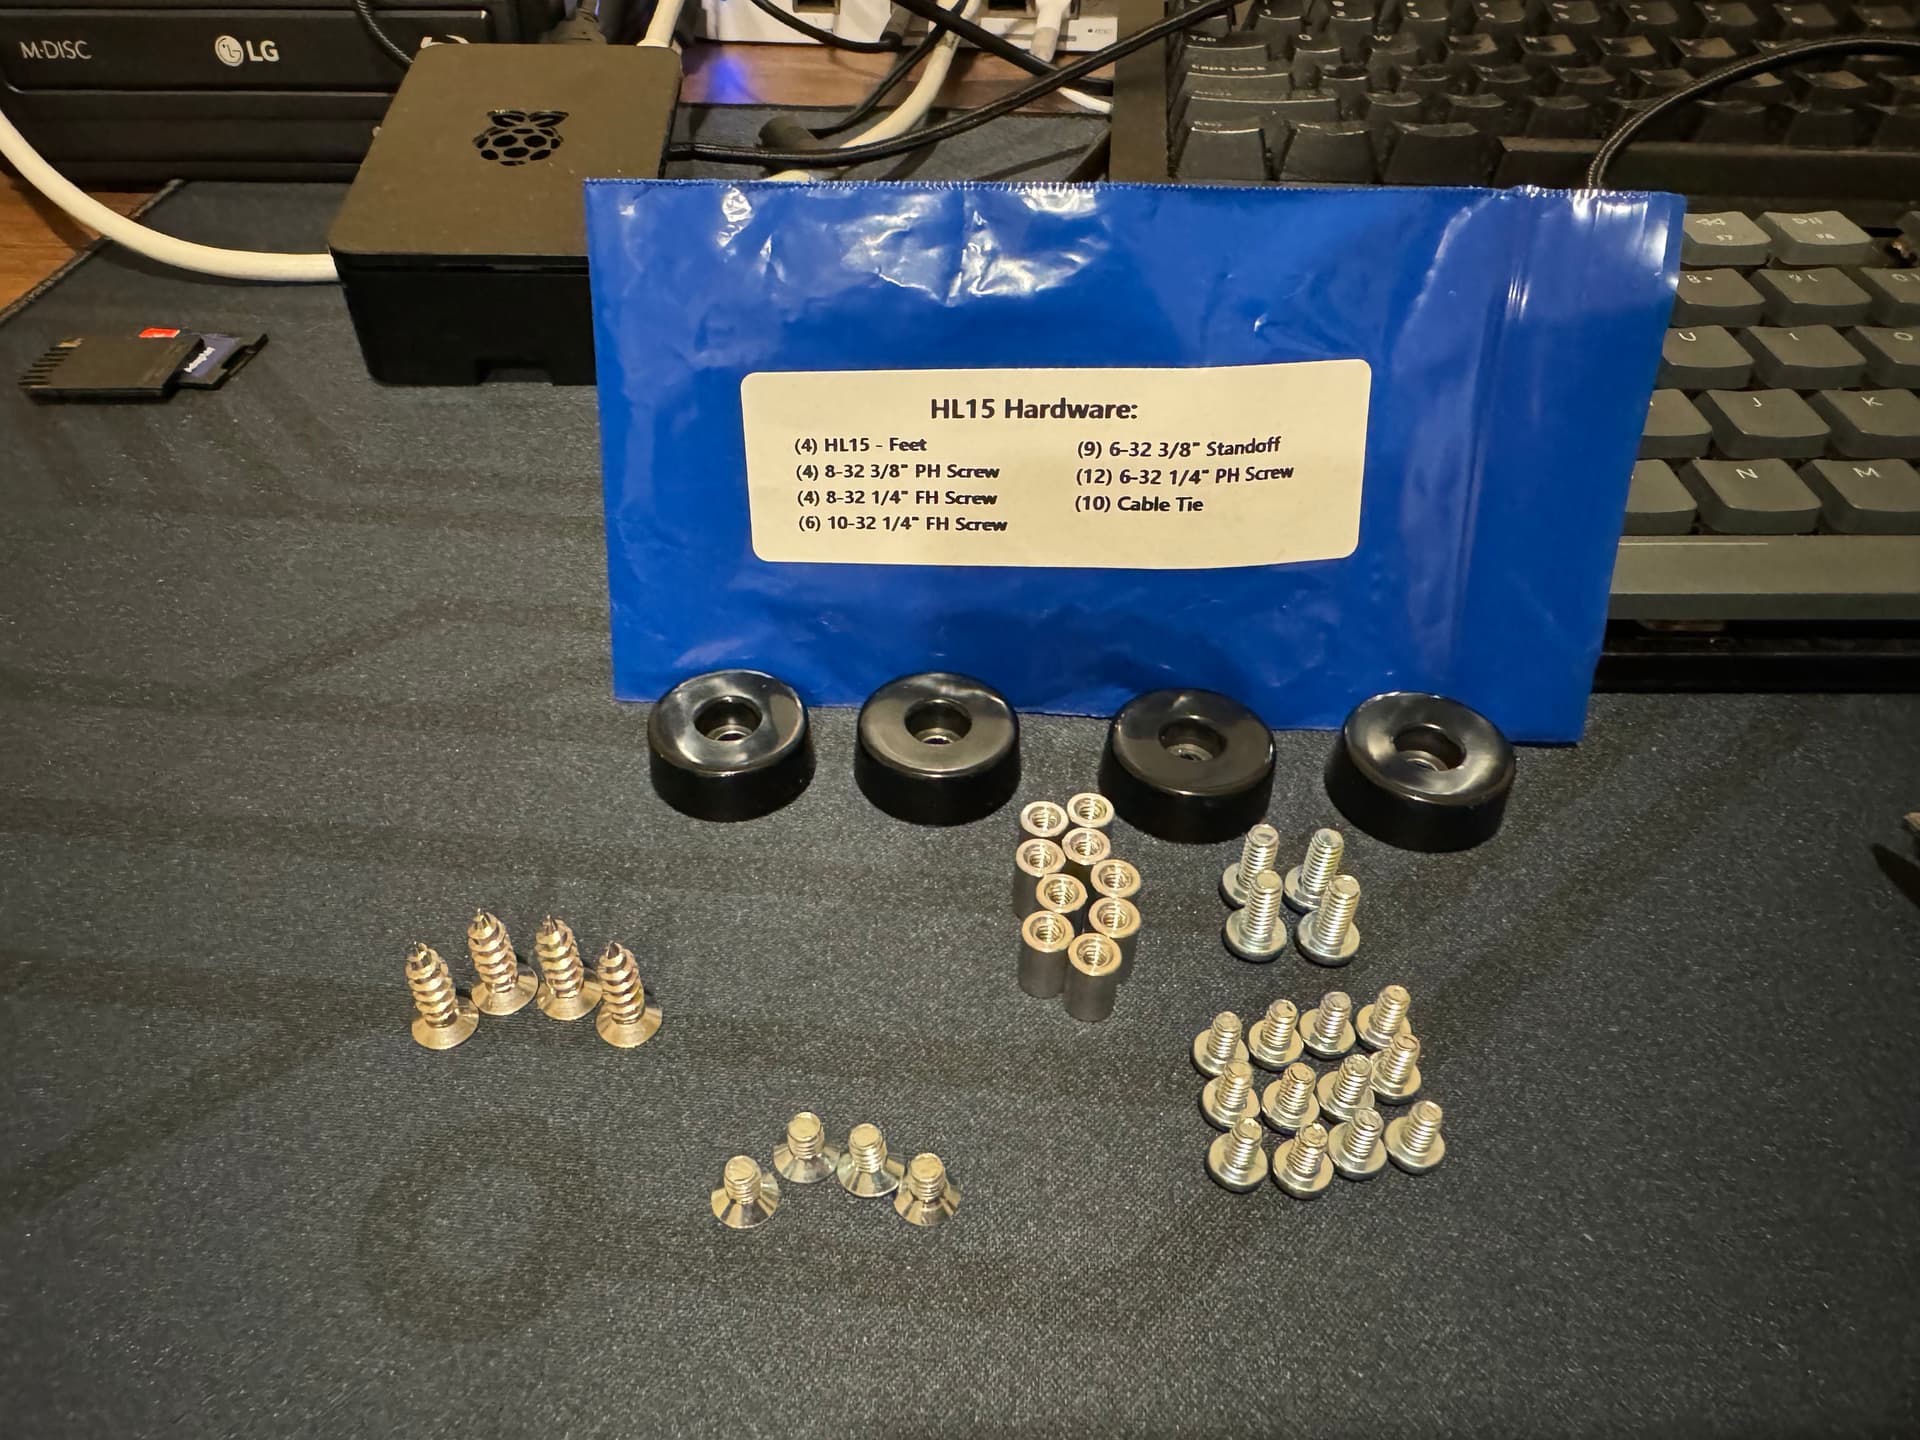
Just received my HL15 today. I ordered the full chassis with the rack rail kit. I’m trying to attach the rails to the chassis and it seems like I don’t have the right screws.
I’m missing the (6) 10-32 1/4" FH screws. For some reason I have self-tapping screws and smaller FH screws that aren’t even listed on the blue bag inventory.
I tried using the FH screws included in the rails kit from SuperMicro but there were only 4 instead of 6 and they were the wrong size. I ended up stripping the threads off those screws.
Send an email to info@45homelab.com and they’ll get you sorted. I think they (theoretically) include the screws for the rack ears in the blue baggie, but you use the screws included with the rails to mount those. Not sure why they wouldn’t work for you. It’s been a month or so since I got mine, so I don’t remember specifically where the screws I used were packed.
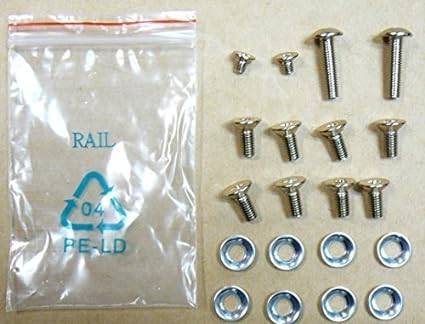
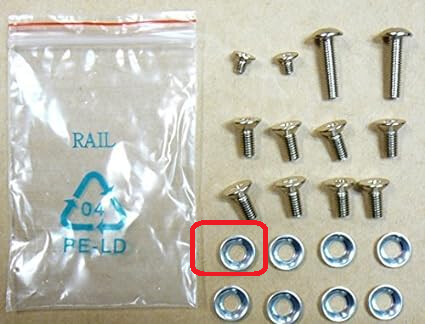
Based on this post, and IIRC, this is the bag that should have come with the rails and the mounting ones would be M5x0.8x12…
.
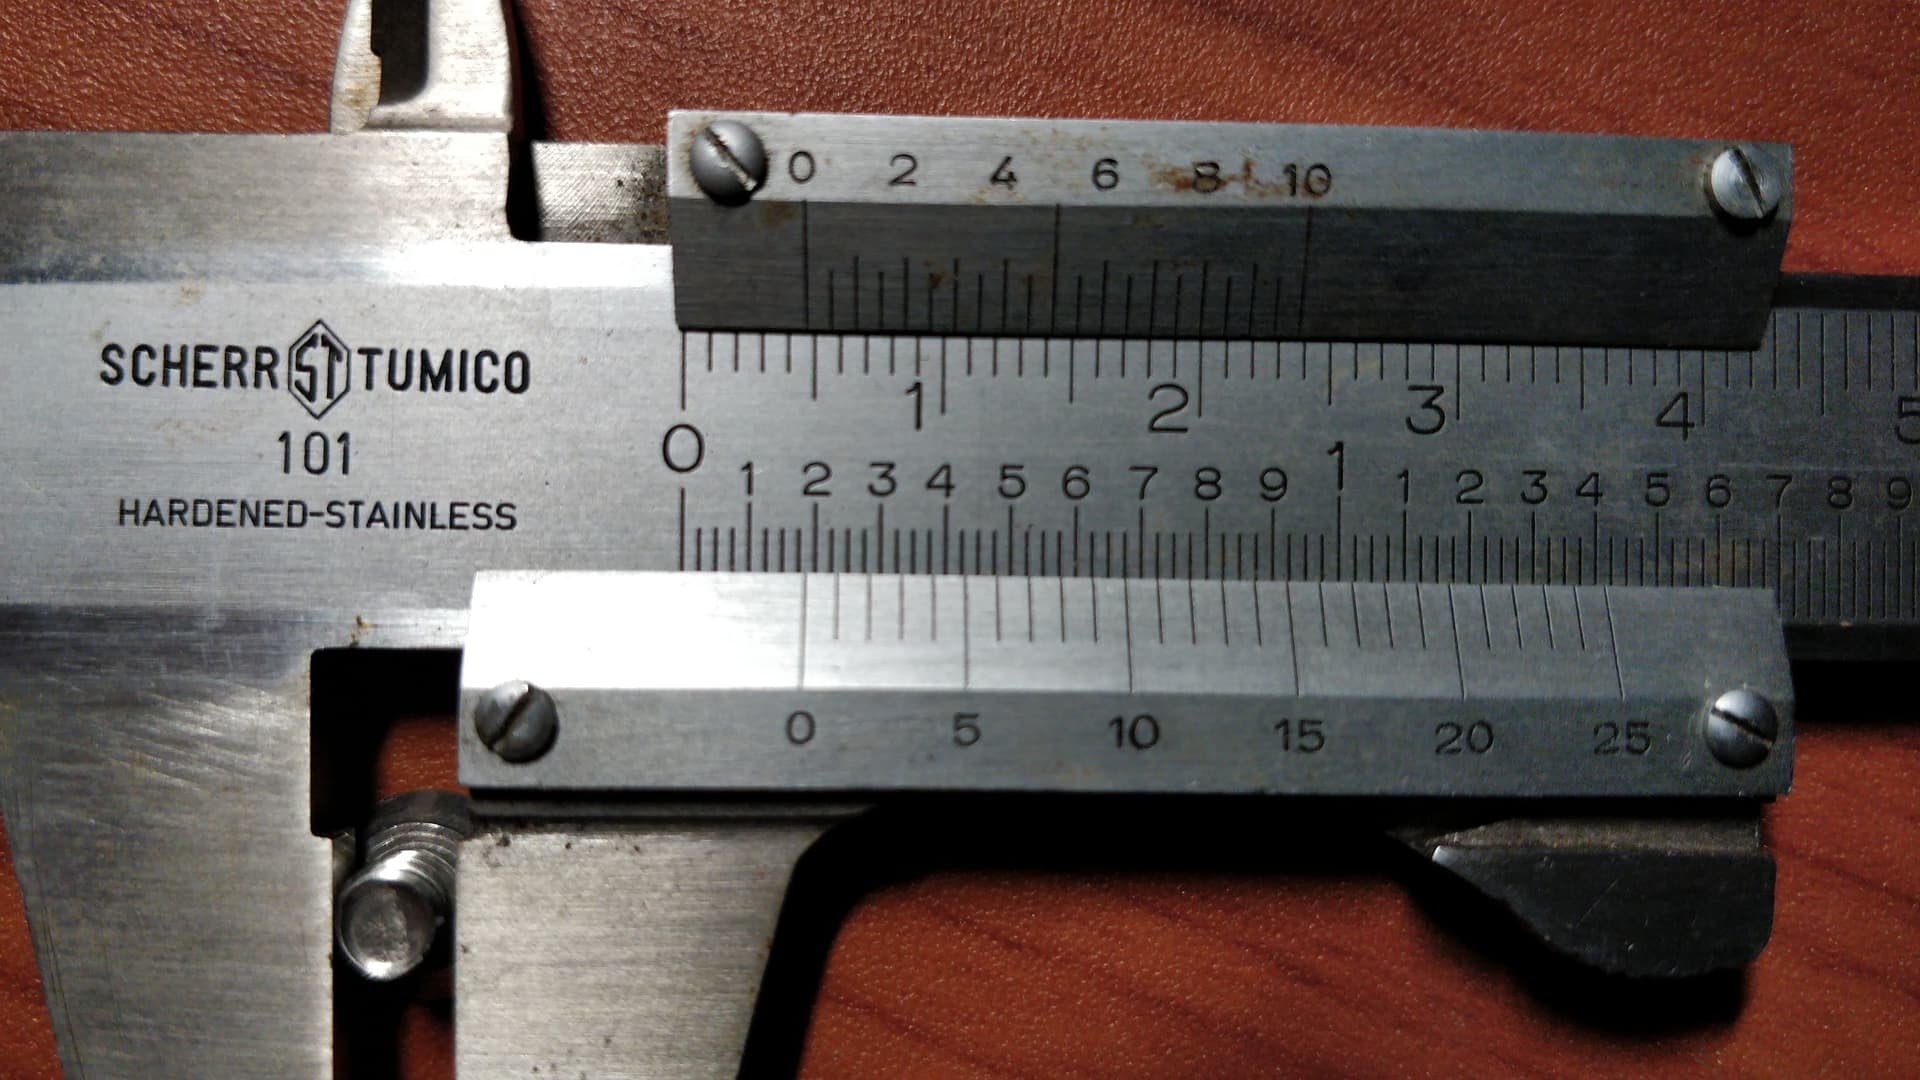
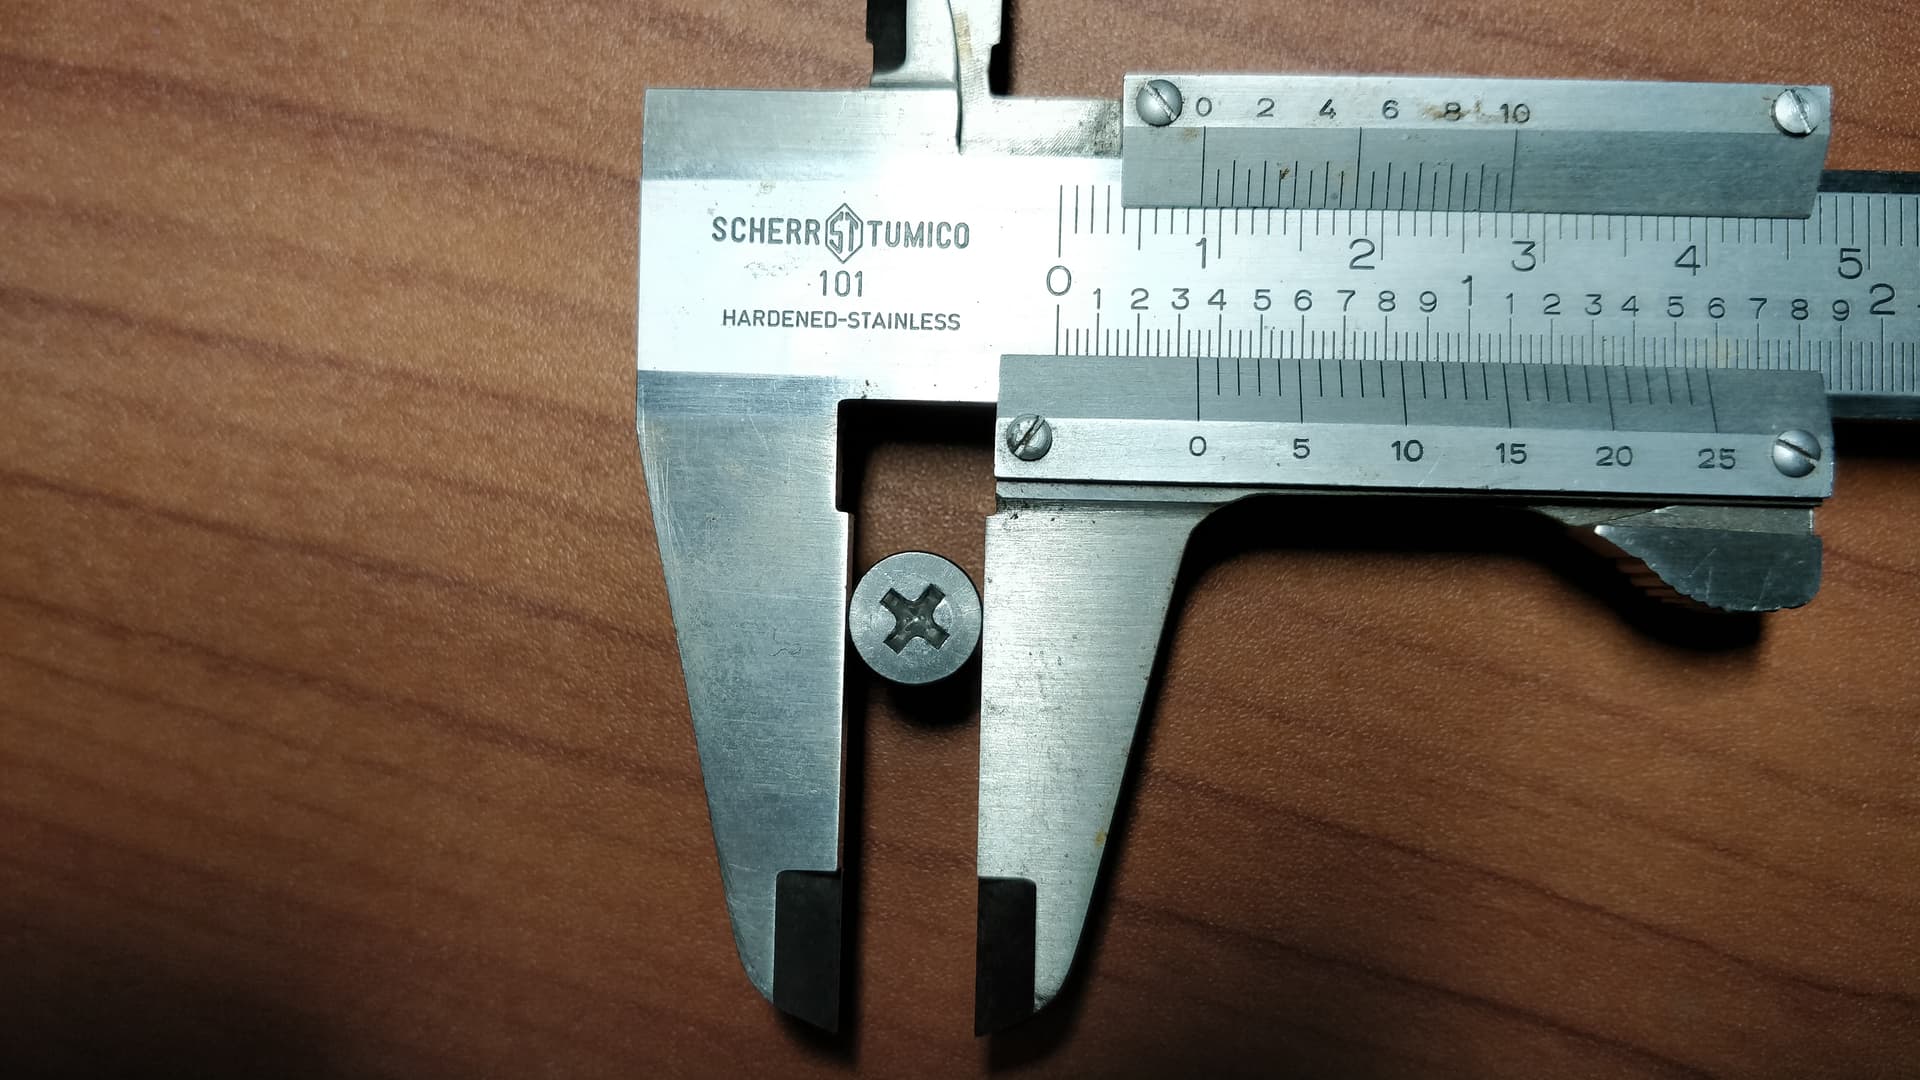
Here’s the screw that works for me for the rails (The large numbers on the bottom main scale are inches and the top are cm);
Screws for the rails come in the rail kit, not the blue bag, was my experience. Probably because the rail kit is an optional extra and not a core part of the HL15 chassis.
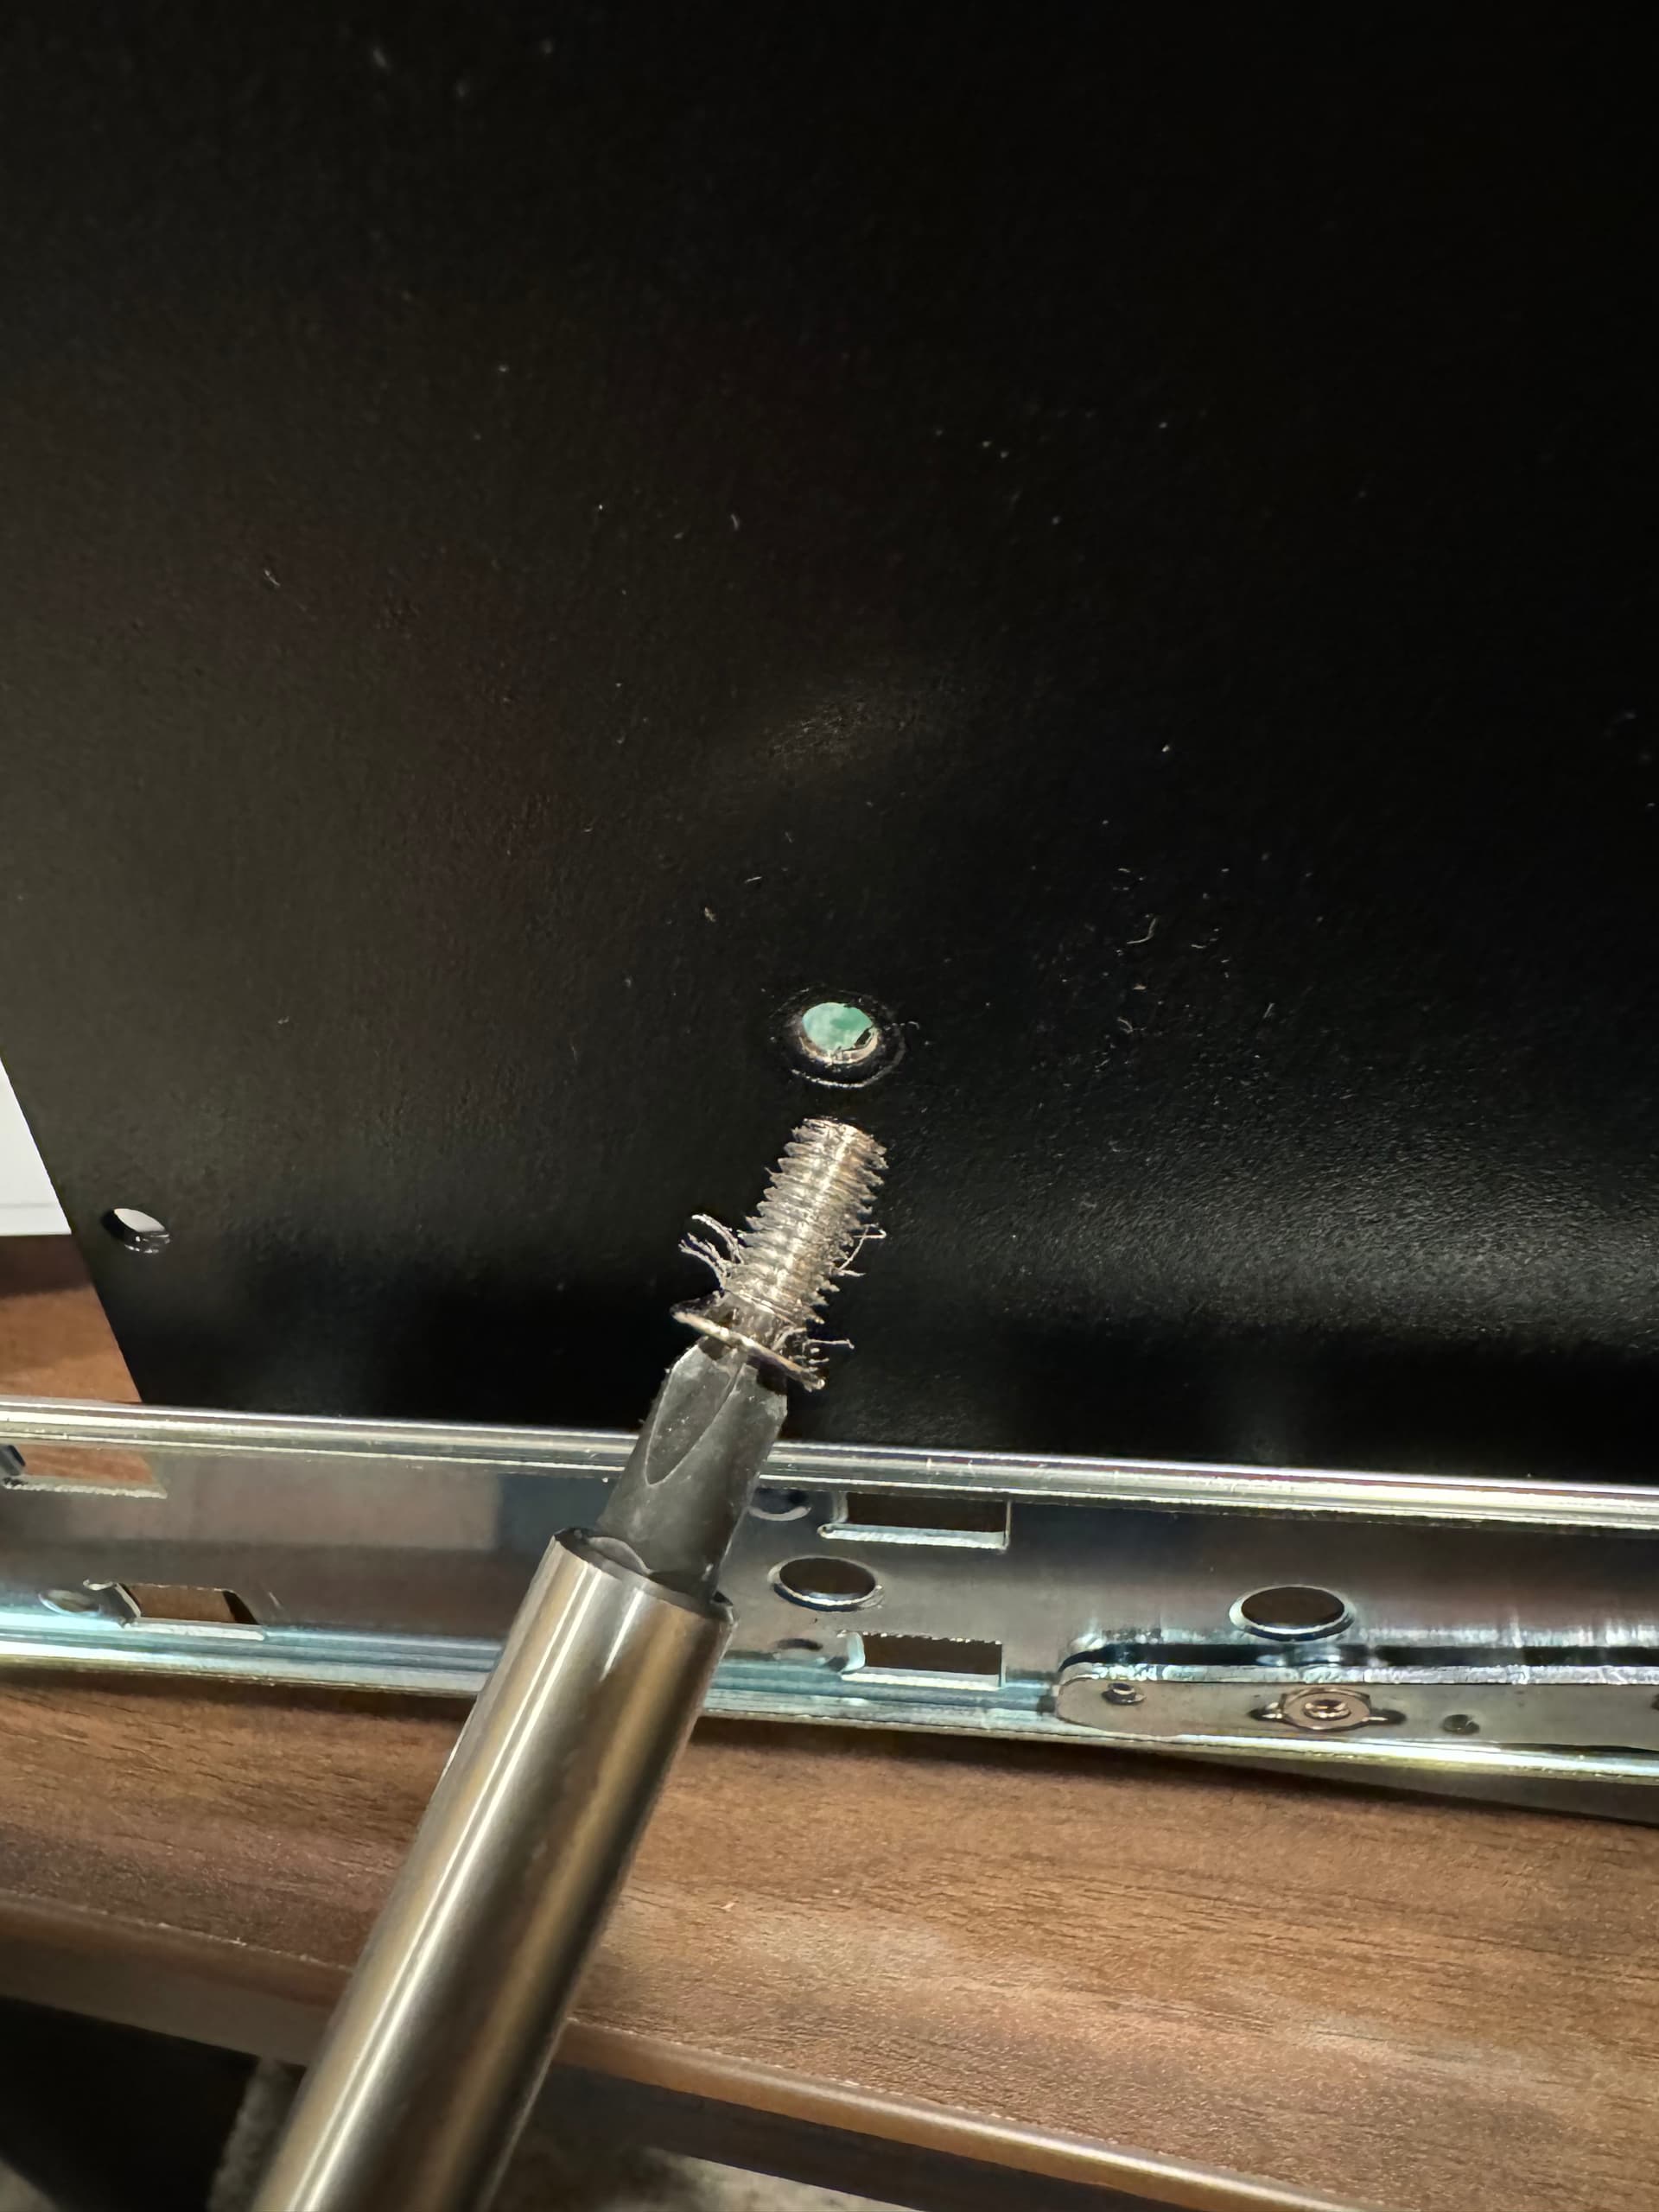
I tried these screws. The holes in the chassis were too tight and ended up stripping the threads off the screws. I only tried this on two holes before I gave up before I caused any more damage.
Vikram (@Ashley-45Drives, @Hutch-45Drives)
I know there is a lot of new things happening with the HL-15 for 45 Drives, but I do feel there is a big assumption that everyone knows which part would be used for each accessory kit. In other words, I am seeing an assumption that people did not know the rails kit (a part) uses a clear bag (the accessory key) rather than the blue bag.
the blue bag is labled HL15 hardware. It was not meant to be used as part of the rails kit.
Also the guide’s picture would serve as a better reference the actual screw with its dimension (or a 1-to-1 image in the pdf) was includes in the reference steps.
I am not trying to be picky but to give some examples:
Page 11 has the Rubber feet with the text “The Rubber feet can be screwed into the base of the system for desktop placement.” The picture is someone using a screw driver to install.
** The picture of the feet reference the correct screw needed
** Mentioned it is in the blue bag
Page 14 has the rail being screwed. Pages 12 thru 13 show the pacakges.
** There is no reference to the screw/screw size needed.
** There is no reference that this would be in the separate plastic bag.
I personally did not have this issue because I had previously ordered rails from Supermicro for two of my chasis (a 1U and 2U chasis). Supermicro’s instructions are worse than the HL-15. It is just if no one has used these before, then it is hard to follow along
OR
we will use the wrong one and cause damage to the screw or the unit.
I started to reference other peoples pictures from this forum or other people on YouTube who were showing how to install the rails. I don’t have the link, but someone wrote a 1-page PDF that helped me.
I normally catalog everyone by taking a picture on my iPhone, but I was too excited to get my HL-15 running (and did not that).
Also we are using Amazon to use a reference the screws that come with the rails kit. It is great until Amazon remove that picture or it gets updated with something else.
If anyone is interested I sourced some extra screws for the rails from McMaste Carr here in the US. They have the same undercut as the screws that shipped with the rail kit.
Hey @pcHome — thanks for these suggestions, and for taking the time to walk us through where the instructions may be unclear for some. You bring up some valid points. I’m sure there are ways for us to make these instructions a bit more clear.
I’ve made note of this, and we’ll work to make better revisions to the documentation.
As always, if anyone has any questions or run into any issues, please let us know here on the forum. We’re happy to assist in any way that we can.
I’m having the same issue with the screws that game with the rails stripping in the screw holes. I just sent over an email to Vikram about it. I’m using the screws pictured above - the ones that come with 8 - and am screwing them into the 3 holes on each side that run down the midline of the chassis. Is this the right thing to be doing? Thanks!
I ended up tapping the holes in the side of the chassis with #10-32 and then rethreaded the 4 screws that came with the rail kit to #10-32, as well. After this, the screws worked great and were nice and tight. I didn’t want to spend $20 for 6 screws from McMaster Carr. Hopefully Vikram can get me the right screws sent out to me. I would prefer to use all 6 screw holes instead of just 4.
Also, these particular screws are very hard to source in the US, outside of McMaster Carr. I tried round head screws from Home Depot. Though they were 1/2” instead of 1/4”, they tightened just fine but the round head caused the rails to not close. You have to use flat heads.
I don’t think you need them for the HL15? The included hardware is for mounting to many different SuperMicro and non-SuperMicro chassis, not just the HL15.
We do not use those screws to attach the rails to our servers, Instead, you should have another bag with 6 screws that are used to attach the rails to the server.
As @DigitalGarden mentioned those are the generic screws that come with the rails for all kinds of different servers.
If people receive the correct screws in the blue bag they can probably figure this out. When they don’t, it becomes very confusing. When the blue bag doesn’t say what each type of screw is for, you can’t know whether that screw is important and for what.
Neither the HL15 User Manual, instructions included with the rail kit, the HL15 blue bag or the Rail Kit bag are very specific about what screws to use and where to get them. In fact the User Manual says “Locate the screws inside the included rail mount kit”. Since not everyone orders rails, it may be surprising that rail mounting screws would be included with every HL15. Obviously, it’s the right thing to do since down the road someone may order rails from somewhere else, as long as they are actually included.
I’d suggest including on the blue bag what each of the PH and FH screws are to be used for. I’d also correct and include more explicit instruction in the User Manual, and perhaps it’s own insert sheet, explicitly stating to ignore the screw packet and instructions included with the Rail Kit when mounting the rails to the HL15 and to use the 6x 10-32 1/4" screws included with the HL15 accessories bag. This might seem redundant to someone who works with these pods every day, but provides a needed level of reassurance and documentation for people where this is their first pod. Easy confirmation that “Hey, I need 6x 10-32 1/4 screws for the rails from the HL15 bag. They aren’t here. Better contact info@45homelab”
I have been following this thread and I am happy to let you know that we have made changes to our screw packaging so that we do not miss any screws moving forward. This will make it easier for all. Should anyone be missing theirs, or need further direction, do not hesitate to email me at info@45drives.com
Thank you for your feedback. Please keep them coming so that we can keep improving.