Asrock Rome8d-2T -Need help with jumper settings and RAM - new build

Greetings all this is my first post. I am a newbie so please be kind to me! I am building a home lab and I went with this board mainly because of the type of RAM it uses and it seemed like a nice fit.

I’m in “IT” so I’m not a newbie in that sense. I am to building PC’s, I haven’t built a PC by myself since Pentium 4 CPU’s were king! Yeah that long.

Anyways I have all my parts and I’m getting close to being ready to test.

Question # 1. I have 6 sticks of 64GB RAM (verified on their list as supported and someone I know also has the same RAM, only he has 512GB) I have read the Asrock manual so many times I practically have it memorized. It doesn’t show you where to place 6 DIMMS it covers 2 , 4, and then 8 which leaves me trying to decipher their pattern as to the right order of where to add a total of 6 sticks. Can anyone help?

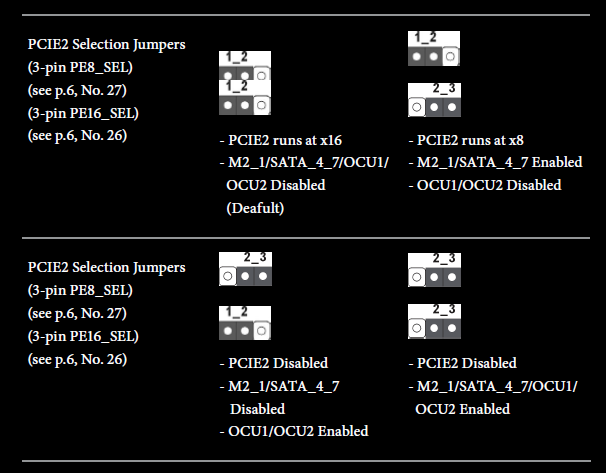
Question#2 I’m sure its been asked before and I did use the search to try and find it but I guess my search foo sucks. This is related to the jumper settings for PCIe 2.

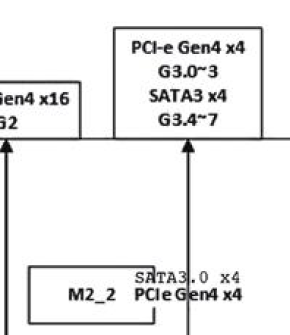
-First, are any of the M2 slots enabled by default? Is m2_2 on by default out of the box? I mention that one because the manual talks about enabling m2_1, which seems backwards but ok..

Second are any of the minisas ports enabled by default? Is 0-3 enabled by default? Again I ask because the doc mentions enabling 4-7 and nothing about 0-3.

What I want:

  • I want to be able to use both m2 slots to hook up NVMe (Samsung 980 pro’s) to them for fast storage as those drive are PCIe 4.
  • I’m curious if any are on by default
  • I also want all 8 sata or minisata to sata I should say enabled so 0-3 and 4-7 so I can in theory use up to 8 drives.
  • Are any enabled by default

I don’t care about losing PCIe 2 completely (the physical slot for it) to enable things.

To me it seems like m2_2 is enabled by default (guessing) and the first minisata port is also on by default (guessing).

Is there someone out there who can just give me the low down on what the heck is enabled by default and what jumpers i need to move to get everything enabled.

I think i need to move the pin jumper to short pins 2 and 3 on both pin slots to enable everything but I have no idea.

Also let’s assume I get 1 or both m2 port enabled, and i have say 2 sata drives hooked up, and a PCIe card installed (not in spot 2) that is also storage (like an intel optane), what is the system going to try and boot off of first by default?

Hoping someone can help me get decisive answers, or else I’m going to basically copy/paste this message to asrock support. I dont want to fire up the board until I know what’s what. The pdf manual is garbage IMHO. Its not even updated to reflect the MB markings correctly in some cases. But I cant do anything about that.

Thanks in advance, literally standing by to go finish the setup!!

Cheers!

What CPU do you have? I think if it is a 7002 series it is recommended to stay with 4 or 8 sticks as the Rome architecture was not designed for unbalanced channels. It will result in a noticeable bandwidth penalty. If it is a 7003 series, you would populate A, C, D, E, G, and H.

There is nothing in the jumper settings for M2_2. M2_2 is always on. You can confirm this in the board architecture diagram which in the manual I have is on page 15. Almost all modern motherboards will have a diagram like this, showing how everything is connected, either directly or through a chipset to the CPU. This helps confirm visually how the cpu is connected to the slots and ports on the board and any shared PCIe lanes.

Referencing the jumpers:


if you want M2_1 and SATA_4_7 enabled then you want one of the two jumper settings on the right. The decision is, do you want to have the other 8 lanes available for the PCIe slot, or oculink. Based on what you have said so far, and you haven’t mentioned oculink, my guess is you want the setting in the upper right. You really need to verify this yourself as since this is likely a new-to-you board, but not a new-from-factory board, the board could have these jumpers in any configuration.

Going back to the architecture diagram, you will see how M2_2 connects directly to the CPU, but if you trace PCIE2, M2_1 and the OCU ports they go through switches into the CPU, those are the jumpers.


This same analysis applies to SATA_0_3. There are no switches or jumpers associated with those, they are never enabled or disabled.

The boot order will follow the waterfall of any modern BIOS, trying to find the first bootable partition, but this can be set and overridden in the BIOS. When you are ready to boot, you can go directly into the bios and confirm. Or, install only your desired boot device first, do your basic setup and smoke test, then shut down, intall the other drives, boot into bios to confirm boot order, and proceed.

thanks yes its a 7003 series and that is the exact memory layout i’m using. I am trying out to boot the system up. I know it can take awhile..

I’ve gotten into the bios, and I can confirm it sees my cpu correctly and also my RAM. Under the storage section there’s nothing for sata, which is expected i haven’t set anything, when I go under NVMe I see my Samsung 980. What I don’t see is a “boot order” like on most machines where you can select the disk or usb stick …cdrom whatever to boot from. Thats not listed. I’m waiting for it to post, i’m having to use a VGA/HDMI adapter to see the screen. I see the MB led screen sitting at A6 or Ab not sure. I’m waiting to see if i get the normal post screen. I turned off the display graphic or whatever, hoping to see like a server style boot up window..I think i’m good..bios is at 3.8. It detects my fans, voltages ect.. there’s a lot of settings in the bios that I’m not used to. leaving things alone for now as. I’m just waiting right now to see what happens next.

Should I / can I hardwire ethernet to the IMPI mgmt port and say my laptop to see what is going on in there or do i need to setup an IP first in the bios and then connect to it. This is a new experience for me. The waiting is brutal!ff

Because this is DDR4, not DDR5, the memory training shouldn’t be too brutal. If it is taking more than 10 minutes then something else is probably wrong. I wouldn’t connect the IPMI to your laptop, I’d connect it to your router, then use the router’s interface to see what IP it was assigned and connect to that from your laptop.

If you are having issues POSTing, I’d confirm your BIOS version, the 7003 series was released after the original Asrock board and required BIOS updates. I’d also consider doing a CMOS reset.

Also consider doing an initial boot with only two RAM sticks. When you get that working, you can add in the other RAM. It will retrain, but you would know that you have smoke tested everything else. IE, if you are having issues, start with the minimal viable configuration and build on it.

I’ll check on how to set the boot order.

1 Like

well now i get a post screen for a second or and i hit f11 to pick something to boot from and then nothing.. even the led display doesnt show any numbers i set the IPMI info in the bios to a static IP and i can reach the website , however admin/admin doesnt work and neither does admin/serial # on the box (and also on the IMPI) port itself.

Here is my advice, but I do not have the board. Whomever had the board before you likely had changed the IPMI password, as I think it forces a change the first time you use it. And a CMOS reset won’t force a change for that, although it might still be advisable.

Are you trying to install a fresh OS for this, or expecting it to find an existing OS on your NVME? I think what you need to do is download a Live USB image of any Linux distro, or the specific one you intend to use. Create the boot USB with Balena or Rufus on your laptop then use that to boot. Hopefully the prior owner has not disabled USB boot. See if that shows up on the one time boot menu. If you can get in that way, then I think you can install ipmi tool into the USB boot session and use that to change the IPMI password.

@rymandle05 is active on this forum and, I believe, does have the ROMED8-2T. He might be able to give you better targeted advice to help get you up and running if he sees this.

My understanding is to permanently change the boot order you would:

  • Power on or reboot the server.
  • Press F2 or Del during POST to enter the UEFI Setup Utility.
  • Use your arrow keys to navigate to the Boot tab at the top.
  • Scroll down to Boot Option Priorities.
  • Select Boot Option #1 and press Enter.
  • Choose your primary boot device from the list.
  • Navigate to the Exit tab and select Save Changes and Exit (or simply press F10).
1 Like

I would recommend ABCDGH based on on the documentation on Page 23 of the manual. It looks its the two slots farthest from the south side of the CPU first and then the two farthest slots north of the CPU. I would then assume the pattern should continue with the two remaining slots south of the CPU.

In the BIOS you can reset the IPMI under Server Mgmt and then BMC Tools and finally Load BMC Default Settings. I’m pretty sure this will also reset the IPMI admin account back to the default admin/admin.

3 Likes

With UEFI, the BIOS will only present options that if finds with bootable UEFI files. @cyberfed have you installed an OS yet on any of these drives?

2 Likes

Well I dont know if it was part of doing the IMPI reset in the bios or what, but I was then able to re-ip the IPMI again. This time admin/admin worked! which I changed and created another account.

I am seeing in the bios the boot order as expected now, I set it to the bios first for now, and the NVME drive second. The KVM works too. So I’m going to see if I can download an ISO and mount it and install an OS for now ubuntu just to get the box working. If not I will proceed the path of making a bootable disk on a USB drive. It doesn’t look via the logs that my error codes were bad.

I’m done for the day I’ve been at it all day building and now starting to test. Glad I can get KVM access and IMPI access. I think I’ll be able to get Ubuntu on there pretty easily now. Once I get a running os and can run more tests on the system, then I will start adding in sata drives, ect..for now just the one drive to get things going.

I download/backed up every option wherever I could in the IPMI interface. I don’t think I want to attempt a BIOS upgrade, not if everything appears to be working. I didn’t expect the OS to boot from the NVME drive, but I was expecting to end up with a screen saying ‘no os found…’ like you do on servers before there’s an OS. The post process until I figure it out is driving me nuts its not like a true server post where you see everything going on. At least not for me and I did turn off the logo.

I’m feeling better than about 2 hrs ago when I was ready to throw all this in the trash.

Since i am going to be running XCP-NG as my hypervisor, any settings other than enabling virtualization thats done, i need to know about? What about AMD specific settings. Never had an AMD before. So I dont know if there are settings (so many settings!) that I need to optimize.

Thanks again all!! Lets pick this up tomorrow!

2 Likes

Bonus Tip: Navigate to Server Mgmt in the BIOS and disable Wait for BMC. This is what actually takes the most time on a cold boot. The memory training is pretty quick. The IPMI will still start but the rest of the system won’t wait for that before proceeding to finish posting and then boot the operating system.

3 Likes

Nice I will make that change as well. Is it supposed to show like a normal post like a server does upon turning it on or no? I’ve been using a vga to HDMI connector that sucks. Sometimes I would turn my monitor off/on again to find out the system wasn’t just dead it was sitting in bios. But its not always the case. I’ve managed to see a baby post screen that asks me push f11 to select a boot device f2 to enter bios and then something else about the firmware. But pushing those keys results in just a black screen. I don’t even get any LED hex codes. It wasn’t until I used the KVM in IMPI that I saw it was sitting at a black screen with a blinking cursor (hey I’ll take any signs off life). So I’m hoping tomorrow with the IMPI/KVM situation that I can ‘see’ more going on. I swear I need to buy a crappy graphics card just so I don’t have to deal with that dumb vga/hdmi adapter! (I wont, if KVM works well in IMPI).

I still have a lot of hurdles to overcome assuming the system installs Ubuntu ok. Getting M2_1 online with NVME (can those be software raided in the bios? I didn’t see anything so I doubt it but I’m not above asking dumb questions!), then sata 2.5" 6Gbps drives online probably do 4 for now, and then the two I’m worried about are my Intel Optane (actually pulled from an Oracle branded server with 99% life left on them) PCIe drives I need to mount in lanes 1 and 3 I guess. 6TB each so getting those working is high on the list! No video cards not an AI rig, I have a real AI rig for that (Nvidia DGX Spark 10).

I think the LED should show the post codes but, as it’s a server, I’m very rarely around to watch it. :upside_down_face: I mostly use the IPMI which does have a Post Snoop tool under the Miscellaneous menu.

The IPMI and BIOS don’t have any RAID capabilities. Ubuntu has options for MDADM and ZFS though. I assume XCP-NG has some kind of software option but I’ve never used it personally. In that situation, all the drives that are part of the RAID should be bootable in the BIOS.

Depending on your use case you may also want to enable SR-IOV, Above 4G Decoding, and IOMMU under the AMD CBS menu.

1 Like

I just checked and the onboard LED on my motherboard does show the post codes during boot up. It goes dark shortly after handing off to the operating system.

1 Like

Lacking explicit info in the Asrock manual, I used this one directly from AMD for the SP3 platform

Memory Population Guidelines for AMD EPYC 7003 Series Processors

See page 12.

1 Like

Fair enough - the 1,2, and 4 DIMM configurations match the ASROCK documentation so this makes sense to go with it for a 6 DIMM setup.

1 Like

yeah the way you guys told me to do the RAM was the way my AI did too. It scraped all sorts of places including AMD documentation. So we human and robot confirmation. I was going to fully populate it but I had to sell 2 sticks to fund the project. But I have access to a mountain of it so it have 512 in a few months, I’m not building a mountain of servers so even 386 is fine. Just looks nicer when its fully populated :slight_smile: . Going to build a bootable iso on a thumb drive of Ubuntu and fire up the virtual KVM (beats working on the floor bustin up my knees) and see how it goes… if it installs then woohoo test 1 complete. Then comes adding in HDDs of all types shapes sizes connections…

I’m glad that everything appears to be good to go so far…I’ve been changing out RAM and CPU sockets on servers my whole life, then when it came to this build I was scared of messing up! lol.

Cheers more to come…

1 Like

Success! Confirmed the VGA–>HDMI adapter is hot garbage and only works when it wants to. Using the built in KVM via IMPI I saw the actual POST what I expected to see normally. I guess the adapter doesn’t think it’s worthy of displaying that! Had I had KVM access the whole time I probably would not have panicked.

So I plugged in a bootable Ubuntu ISO I burned via USB. To my surprise after it was going through the POST process it must have set itself to boot from USB as it did automatically and I installed Ubuntu. I have added the next scary part. The two PCIe 6TB drives, they are half height it seems so they dont allow me to screw the top into the case, I will take pictures and share. I’m guessing I need some sort of riser card adapter or something. Looks ghetto, but more concerning is the cards can easily get moved out of the PCI slot slightly. Granted once the server is stationary in its final resting spot it probably wouldn’t matter but I would rather fix that concern. I think I can best describe it as being a half height PCIe card.

I just put them in and I’m going to see if the BIOS picks them up and Ubuntu as well. Oh boy…!

1 Like

PCIe cards were automatically picked up in Ubuntu! They are showing as 4x 3.2TB drives due to the fact they were carved up when I did an openNAS set up. I’m trying to google my way through making two 6 TB drives again.

But the MB sees them as NVMe and Ubuntu too. So far so good. I wish I could manually control the fans, I need to ramp up the bottom ones (case is still not fully put together) because those 6TB cards are toasty. It looks like you can do it in the IMPI but honestly that is so confusing the amount of pages for the fans I don’t know what is what. In the end I want the system to handle PWM as needed, but for right now I wish I could take over fan 7 and ramp it up to cool the cards. Also thinking maybe moving one of the cards further apart for cooling. I’ve got two ovens next to each other so the card behind it wont get my air flow (until the case is put together completely) from the air coming in the bottom (3x 140mm fans but they are at 500 rpm).

Here is are pictures of the half height ghetto situation, if anyone knows what part I need to buy to remedy this that would be most helpful! Plus a pic of the case from above, you can see my ghetto working conditions, yes on the floor in a hallway :joy:. I’ve abandoned the monitor for the KVM.

I guess I’m not allowed to post more than one image at a time as a newbie here..

The ghetto hallway build out spot, actually it was moved here because I needed more outlets :slight_smile:

1 Like